MaxTAF Install
MaxTAF installation involves installing the Maximo add-on and creation of MaxTAF directory. The MaxTAF directory is where all the Test Scripts are saved and compiled.
Keeping MaxTAF directory out of standard Maximo build enables MaxTAF tests to be compiled to Java classes and run on the fly as you develop them.
Also, you need to install the MaxTAF Recorder extension for FireFox or Chrome. The MaxTAF Recorder only needs to be installed if you want to record and play UI tests.
Please refer to the MaxTAF User Guide for more information.
Before you begin
You install MaxTAF version 7.x-3.0.0 on a Windows administrative workstation where IBM Maximo Asset Management version 7.6.x.x is already installed. However, you can create the MaxTAF directory on any location accessible to Maximo application server.
Product Installation Files
To perform the installation of MaxTAF 3.0.0, you need the following files:
- maxtaf-core-7.x-3.0.0.zip
- maxtaf-mxml-7.x-3.0.0.zip
- maxtaf-recorder-3.0.x.xpi
- All patches for Core and MXML Components
You can find latest patches for Core and MXML Components, in the "Patches" section of the particular download. You only need to download the latest patch zip file (e.g. if there are maxtaf-core-7.6.x.x-3.0.1.zip and maxtaf-core-7.6.x.x-3.0.2.zip in "Patches" section, download only the maxtaf-core-7.6.x.x-3.0.2.zip).
If there are no patches for a component, skip the steps in this guide that reference them.
Procedure
- Prepare for installation of MaxTAF
- Access MaxTAF product software from the supplied ZIP files
- Install MaxTAF on the administrative workstation according to the install guidelines below
- Perform your post-updatedb procedures
- Copy the maxtaf folder to your preferred location (unzip from supplied ZIP file)
- Build the EAR files
- Redeploy the EAR files
- Restart application server
- Do post installation checks and tasks
- (Optional) Install supported Firefox version
- (Optional) Add MaxTAF Recorder extensions to Firefox
- (Optional) Start the Selenium Server
Prepare for the installation
The installation of MaxTAF will modify the configuration and the content of your application server, database server, and directory server. These servers are known as the middleware servers.
Procedure
- Back up the middleware servers, the database, and the administrative workstation.
- Prepare the application server
Ensure that the middleware server is started, but Maximo application server is stopped. Consult Maximo guide on how to stop the Maximo server from within WebSphere.
Installation of the MaxTAF product on the administrative workstation
The installation of MaxTAF product involves copying files from the ZIP package to the Maximo root folder, creating a folder where MaxTAF files will reside and running the updatedb procedure. You will also need to rebuild and re-deploy Maximo EAR.
The installation includes running of the updatedb (database update) script, so please make sure that your database does not have any pending changes prior to starting the installation, otherwise the installation might fail and you would have to restore the database.
This guide will refer to the Maximo install home as <MAXIMO_HOME>, you will need to substitute this with the actual Maximo install home path (for example, on Windows OS C:\IBM\SMP\Maximo).
Procedure
- Copy contents of maxtaf-core-7.x-3.0.0.zip to <MAXIMO_HOME> folder.
- Copy contents of all Core patch zip files (e.g. maxtaf-core-7.x-3.0.2.zip) to <MAXIMO_HOME> folder in order of version.
- Create MaxTAF folder - Copy contents of maxtaf-mxml-7.x-3.0.0.zip to your preferred location which may reside on different machine than the administrative workstation.
- Copy contents of all MXML patch zip files (e.g. maxtaf-mxml-7.x-3.0.1.zip) to the location that contains MaxTAF folder in order of version.
- Edit <MAXIMO_HOME>\tools\maximo\maxtaf\install.properties file. Set the value of MAXTAF_DIR property to point to the MaxTAF folder that you created earlier.
If you are using backslashes in the path, you will need to escape them with another backslash (e.g. D:\\maxtaf). If you are using forward slashes a single one will suffice.
-
Open terminal window as Administrator
It is important to run terminal as Administrator, otherwise the install will fail.
- From terminal, go to <MAXIMO_HOME>\tools\maximo
- Perform your standard UpdateDB procedure. This mainly consists of running <MAXIMO_HOME>\tools\maximo\updatedb.bat (for Linux: updatedb.sh).
You will need to perform any procedures that you may have associated with the running of updatedb. E.g. you may need to run an sql script prior to updatedb to save all the custom class names of your objects, attributes etc. and then restore them once the updatedb is done.
- Enable MaxTAF MIF listeners (optional)
- Rebuild and redeploy the EAR file
We advise using the standard buildmaximoear.bat or .sh to build the ear as opposed to buildmaximoearwas8.bat or .sh. If you are using the was8 variant there might be some issues in classpath differences that the was8 procedure introduces.
- Restart the Maximo application server
- Do post installation checks and tasks
Enable MaxTAF MIF Listeners
You can optionally enable MaxTAF MIF Listeners. These will enable the monitoring of data which goes through the JMS queues.
-
To activate MaxTAF MIF listeners for Maximo, modify the ejb-jar.xml file located in the <MAXIMO_HOME>\applications\maximo\mboejb\ejbmodule\META-INF directory
Uncomment the following lines:
	<!--MaxTAF MDB
	<message-driven id="MessageDriven_MaxTAFQueueListener_1">
	  <ejb-name>MaxTAFQueueListener-1</ejb-name>
	  <ejb-class>rs.cdl.iface.jms.JMSQueueListener</ejb-class>
	  <transaction-type>Container</transaction-type>
	  <message-destination-type>javax.jms.Queue</message-destination-type>
	</message-driven>
	<message-driven id="MessageDriven_MaxTAFQueueListener_2">
	  <ejb-name>MaxTAFQueueListener-2</ejb-name>
	  <ejb-class>rs.cdl.iface.jms.JMSQueueListener</ejb-class>
	  <transaction-type>Container</transaction-type>
	  <message-destination-type>javax.jms.Queue</message-destination-type>
	</message-driven>
	-->
	<!--MaxTAF MDB
	<container-transaction>
	  <method>
		<ejb-name>MaxTAFQueueListener-1</ejb-name>
		<method-name>*</method-name>
	  </method>
	  <trans-attribute>Required</trans-attribute>
	</container-transaction>
	<container-transaction>
	  <method>
		<ejb-name>MaxTAFQueueListener-2</ejb-name>
		<method-name>*</method-name>
	 </method>
	  <trans-attribute>Required</trans-attribute>
	</container-transaction>
	-->
-
Next, modify modify the ibm-ejb-jar-bnd.xmi file located in the <MAXIMO_HOME>\applications\maximo\mboejb\ejbmodule\METAINF directory.
Uncomment the following lines:
	<!--MaxTAF MDB
	<ejbBindings xmlns:xmi="http://www.omg.org/XMI" xmi:type="ejbbnd:MessageDrivenBeanBinding" xmi:id="MessageDrivenBeanBinding_2" activationSpecJndiName="intjmsact_out">
	  <enterpriseBean xmi:type="ejb:MessageDriven" href="META-INF/ejb-jar.xml#MessageDriven_MaxTAFQueueListener_1" />
	</ejbBindings>
	<ejbBindings xmlns:xmi="http://www.omg.org/XMI" xmi:type="ejbbnd:MessageDrivenBeanBinding" xmi:id="MessageDrivenBeanBinding_2" activationSpecJndiName="intjmsact_in">
	  <enterpriseBean xmi:type="ejb:MessageDriven" href="META-INF/ejb-jar.xml#MessageDriven_MaxTAFQueueListener_2" />
	</ejbBindings>
	-->
- Run add_listeners.bat (for Linux: add_listeners.sh) located in <MAXIMO_HOME>\tools\maximo\maxtaf folder.
-
Enter WebSphere root path which must contain the full path to the AppServer folder of your Maximo application
Example: C:\IBM\WebSphere\AppServer01 on Windows OS. - Enter the name of the JMS bus used for inbound messages. Leave blank to skip (useful when installing on clustered environment).
-
Enter the name of the JMS bus used for outbound messages. Leave blank to skip.
To find out the name of the correct bus in WebSphere, open WAS console and go to Service Integration > Buses. If there is more than one bus and you are uncertain which bus is used by your Maximo server, follow this procedure:
- In your WAS console go to Servers > Application Server > Maximo_App_Server (for example MXServer) > Messaging Engines
- Click on active messaging engine
- Look for the value of the field named "Bus name", like the highlighted text in the screenshot below.

- Enter WebSphere authentication parameters. (WAS administrative user name and password)
Post-installation check
Log in to Maximo as a MAXADMIN group member and click on the Help link in the top right corner, from the dropdown menu click on System Information.
You should see MaxTAF entry in the System Information dialogue.
Also, open the Go To menu. You should see MaxTAF menu group with applications: Test Case, Test Suite and MaxTAF Administration.
Post-installation tasks
In order to complete the installation and start using MaxTAF, you have to enter the license provided by Code Development.
MaxTAF Licence
- Log in to Maximo as a MAXADMIN group member
- Go to MaxTAF > MaxTAF Administration application
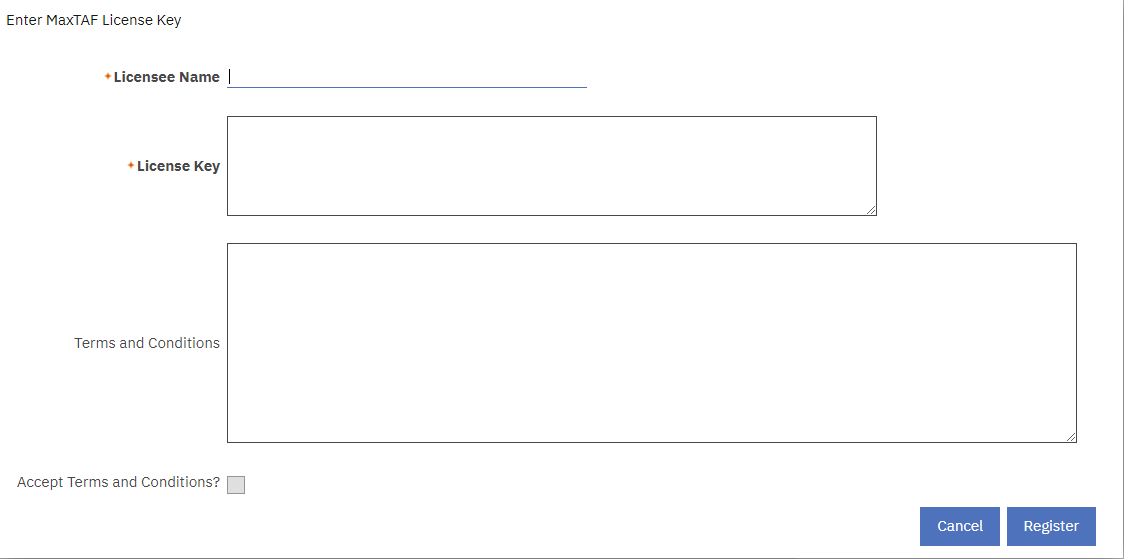
- Click "Enter License Key".
Enter provided info to the following fields:- Company Name
- License Key
- Accept the license, click on check box Accept Terms and Conditions
To enable this check box you need to tab-out from License Key field.
- Click on "Register" button.
MaxTAF MIF Plugin Licence
- Log in to Maximo as a MAXADMIN group member
- Go to MaxTAF > MaxTAF Administration application
- Click "Add Plugin License".
Enter provided info to the following fields:- License Identifier
- Plugin name
- Description
- License class

- Display the details for MIF plugin and click "Enter License Key".
Enter provided info to the following fields:
- Company Name
- License Key
- Accept the license, click on check box Accept Terms and Conditions
To enable this check box you need to tab-out from License Key field.
- Click on "Register" button.
MaxTAF Properties
- Log in to Maximo as a MAXADMIN group member
- Go to MaxTAF > MaxTAF Administration application
- As part of installation process, following properties are added to MaxTAF Properties:
directory- MaxTAF Directorylib.001- Default MaxTAF libslog.directory- MaxTAF Logs Directory
<MAXIMO_HOME>\maxtaf\<MAXIMO_HOME>\maxtaf\lib\*<MAXIMO_HOME>\maxtaf\log\
- If these values are incorrect, you need to change their value and set them to location where you extracted the maxtaf folder, e.g. for maxtaf forlder in the root of the C:/ drive on Windows OS
directoryproperty value changed toC:\maxtaf\
lib.001property value changed toC:\maxtaf\lib\*
log.directoryproperty value changed toC:\maxtaf\log
You can now start using MaxTAF. Please consult the User Guide and Developers Guide for further information.
Installation of the MaxTAF User Interface Recorder extension
You will need either Firefox or Chrome to record Maximo user interface tests.
Before you Begin
As of August 2019, MaxTAF 3.0.0 supports Maximo 7.6.x.x. The recorder :
- Firefox up to Version 68.0.1
- Chrome up to Version 75.0.3770.142
If you don't have either browser installed at all and would like to record UI tests, please install your chosen browser from these resources:
- Firefox: 68.0.1 (choose your OS and language).
- Chrome: Current Version
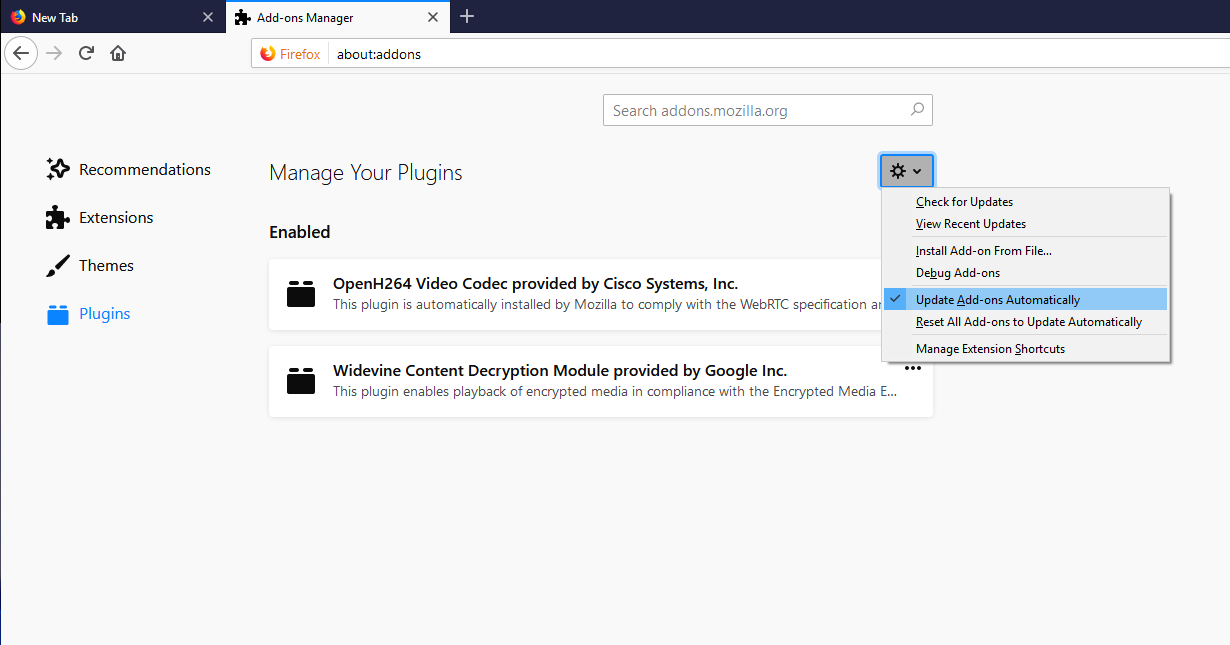
Note: Firefox has a separate option for automatic update of Extensions and Add-ons. This option needs to be switched off. The option is available from the settings menu within the "Add-on Manager" as can be seen on the image below.
Procedure to install the MaxTAF recorder in Firefox
After you have installed Firefox, you will need to install the MaxTAF Recorder extension.
- Open Firefox
- Open the Side Tray > Add-ons (or Ctrl+Shft+A)
- Click the Settings button and select Install Add-on from File
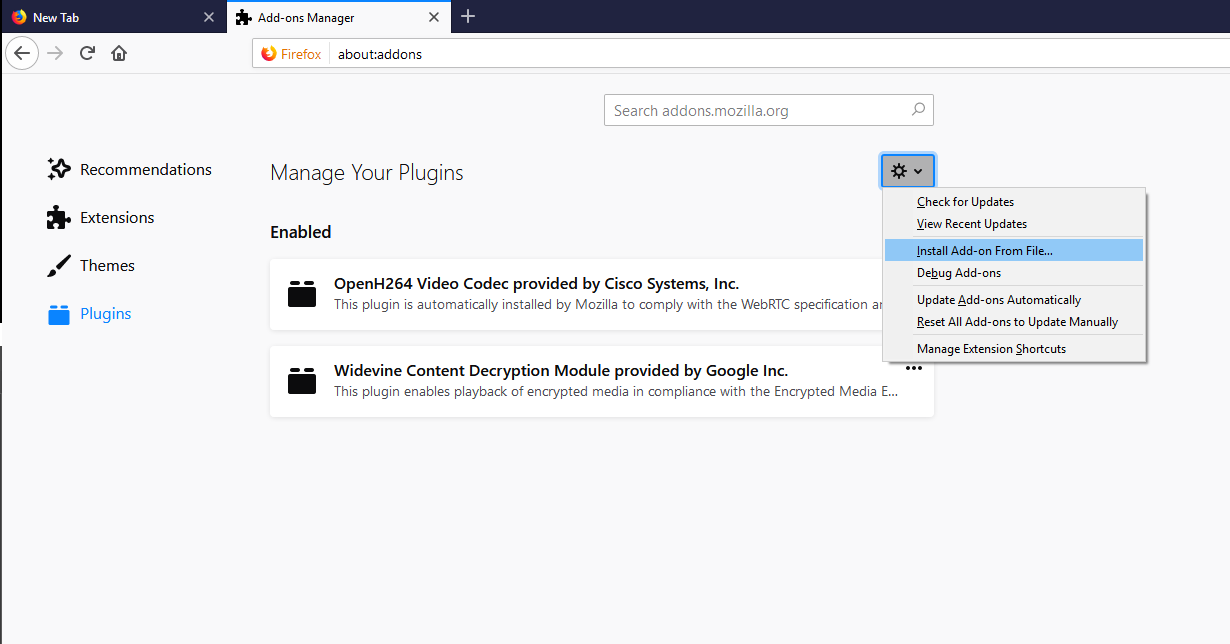
- Locate the "maxtaf-recorder-3.0.0-firefox.xpi".
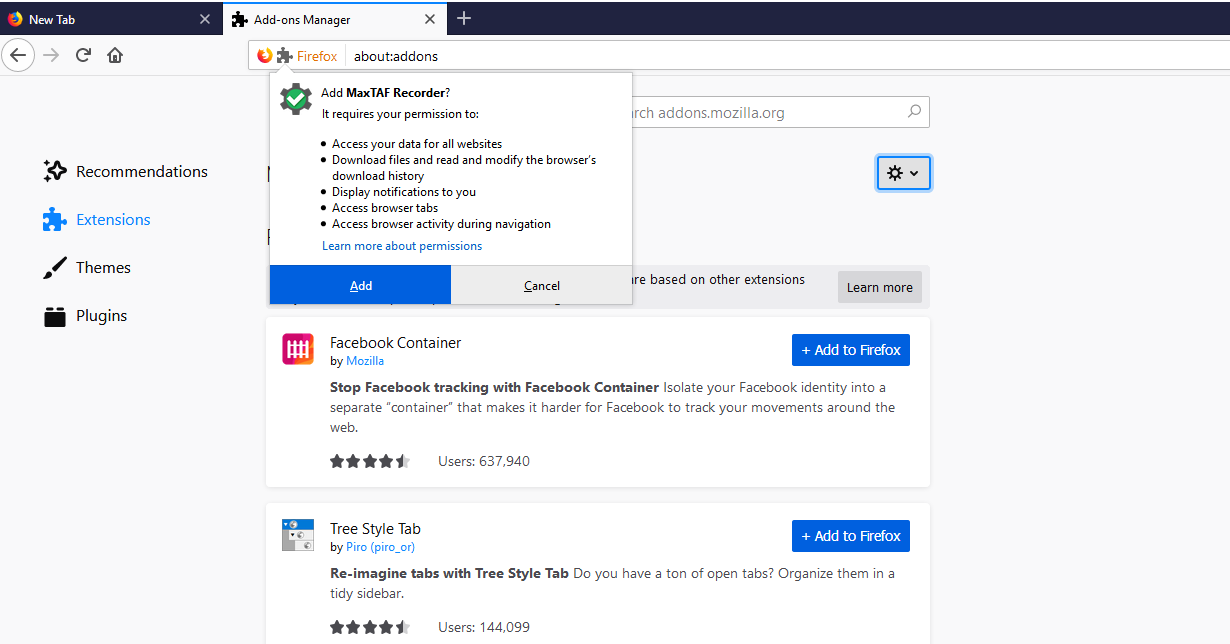
- Click "Add"
Procedure to install the MaxTAF recorder in Chrome
After you have installed Chrome, you will need to install the MaxTAF Recorder extension.
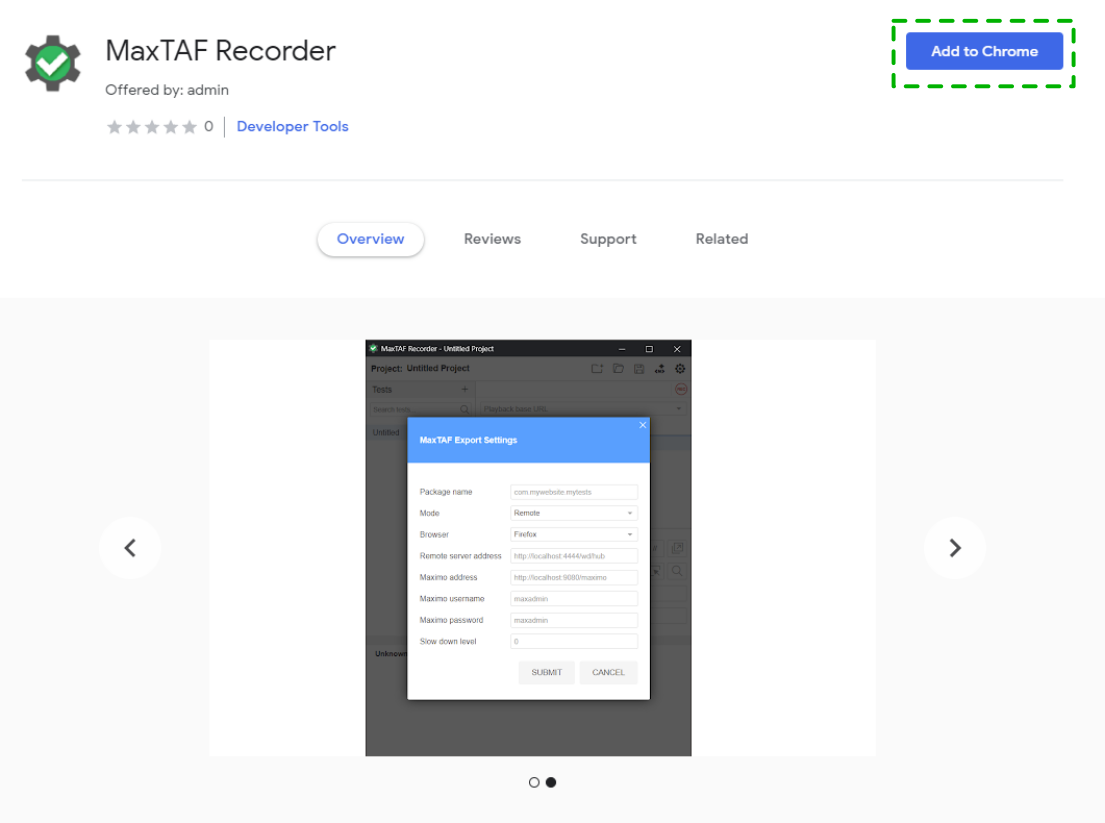
- Open this link "MaxTAF Recorder - Chrome" in Chrome
- Press "Add to Chrome"
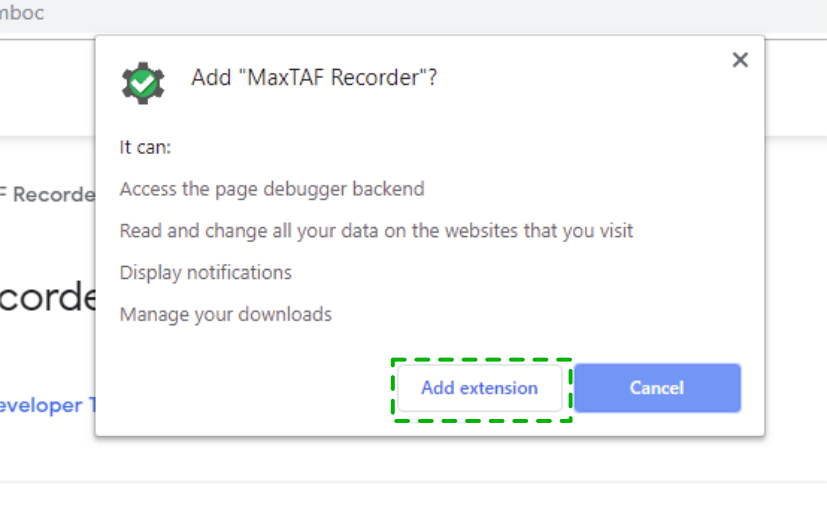
- Press "Add Extension"
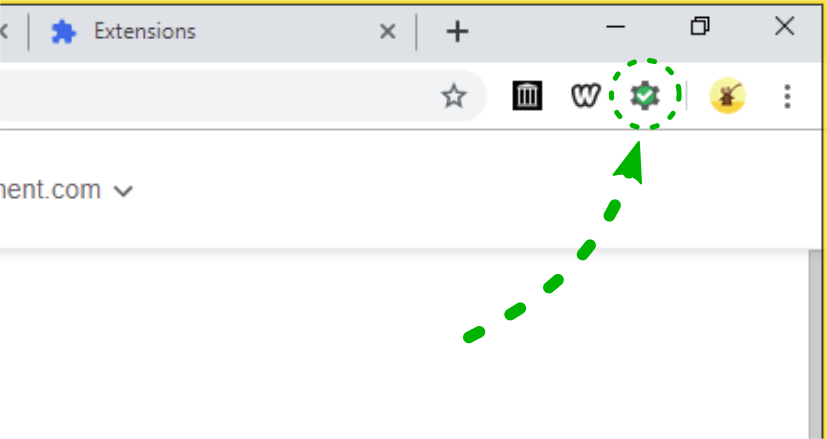
- Your extension is now installed, and accessible from the top corner of the browser
Configuration of the MaxTAF Recorder
MaxTAF Recorder is an add-on for Chrome and Firefox that provides many options including the "Record and Play" functionality.
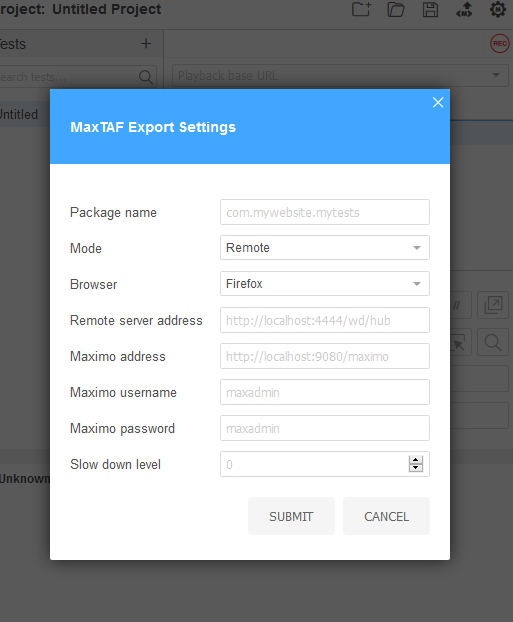
On Launch The MaxTAF Recorder allows you to input parameters that are relevent to the execution of your tests on playback.
This Guide describes configuration options for MaxTAF Recorder. It is assumed that the MaxTAF Recorder add-on is installed.
Change the values of the parameters to the values that you will be using for your UI tests.
Starting the Selenium Server
A Selenium Server is needed to execute UI tests. It will play previously recorded tests. Please consult MaxTAF Developers Guide on how to record and play UI tests.
The Selenium Server can be deployed in 2 different ways, depending on how you are using Maximo. Selenium server can run on the Maximo server machine, or on user's computer. Different setups are merely a preference and the functionality is not affected by your deployment option. The deployment options are:
- Selenium Server is deployed to the Maximo administration workstation - This option is mostly used on single user development setups (for example a development virtual machine). This deployment does not need any further network setting as both Selenium and Maximo servers reside and are executed on the same machine.
- Selenium Server is deployed to the user computer - Selenium server will communicate with the Maximo server through the network and a port must be opened on both user's computer and the server (by defult port 4444) for this to work. Java needs to be installed on user's computer to run the Selenium server.
Deploy and start Selenium on the Maximo administration workstation
- Open terminal windows as Administrator (right-click, Run as Administrator)
- Go to <MAXTAF_DIR>\bin folder
- Run "java -jar selenium-server-standalone-2.53.1.jar" for Maximo 7.6.0.x" or "java -jar selenium-server-standalone-3.141.59" if you have Maximo 7.6.1.x.
Earlier versions of Maximo are supported by earlier versions of MaxTAF, so consult former guides for information on those.
(Java must be in your PATH variable. If it is not, then go to your Java install home folder and run from there using the full path to the Selenium Server jar file)
Deploy and start Selenium server on the user computer
- Copy the selenium server jar file from the "bin" folder of your MaxTAF installation package to the user computer
- Open command prompt as Administrator (right-click, Run as Administrator)
- Go to the folder where the jar file has been copied to
- Run "java -jar selenium-server-standalone-2.53.1.jar" for Maximo 7.6.0.x" or "java -jar selenium-server-standalone-3.141.59" if you have Maximo 7.6.1.x.
(Java must be in your PATH system variable. If it is not, then go to your Java install home folder and run from there using the full path to the Selenium Server jar file) - Make sure that the firewall on the user machine does not block port on which Selenium is establishing the connection (by default that is port 4444)
- When creating a UI test in Maximo, you have to change two test case parameters for this setup to work:
- remoteSelenesServerAddres - set this to the URL of the computer where Selenium server is started (user computer)
- maximoAddress - set this to the URL of the Maximo server
Once Selenium Server is up and running you can execute MaxTAF UI tests from the MaxTAF application in Maximo. Please consult the MaxTAF User Guide on how to run pre-recorded tests.
Set-up for Running tests on Different Browsers
Before you Begin
Before configuring Edge or Internet Explorer, you must make sure that the Windows Scaling Settings are set to 100%. Tests will misbehave if this is not set.
Go to Windows Settings (from Start Menu) -> System -> Display -> (Under Scale and Layout) Make sure the setting 'Change the size of text, apps and other items' is set to "100% (Recommended)"
Configuring Internet Explorer
Proper configuration is required in order to run tests on Internet Explorer. Download the IEDriverServer.exe which is provided here. This file needs to be on the system PATH.
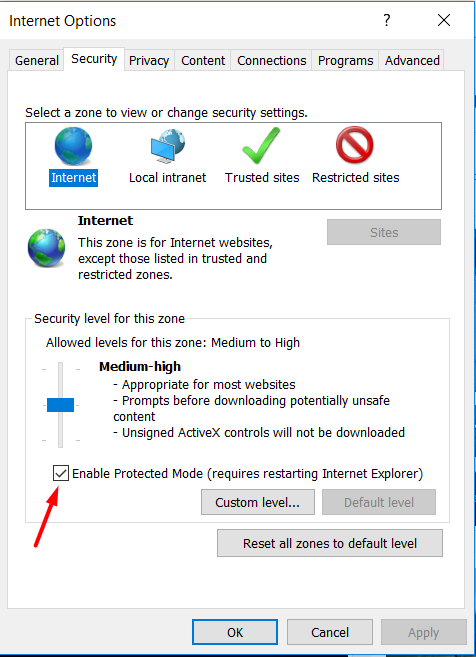
Second, the "Enable Protected Mode" setting should be set to the same value for all the zones (preferably disabled). You can find this setting in Control Panel -> Internet Options -> Security tab.
Configuring Edge
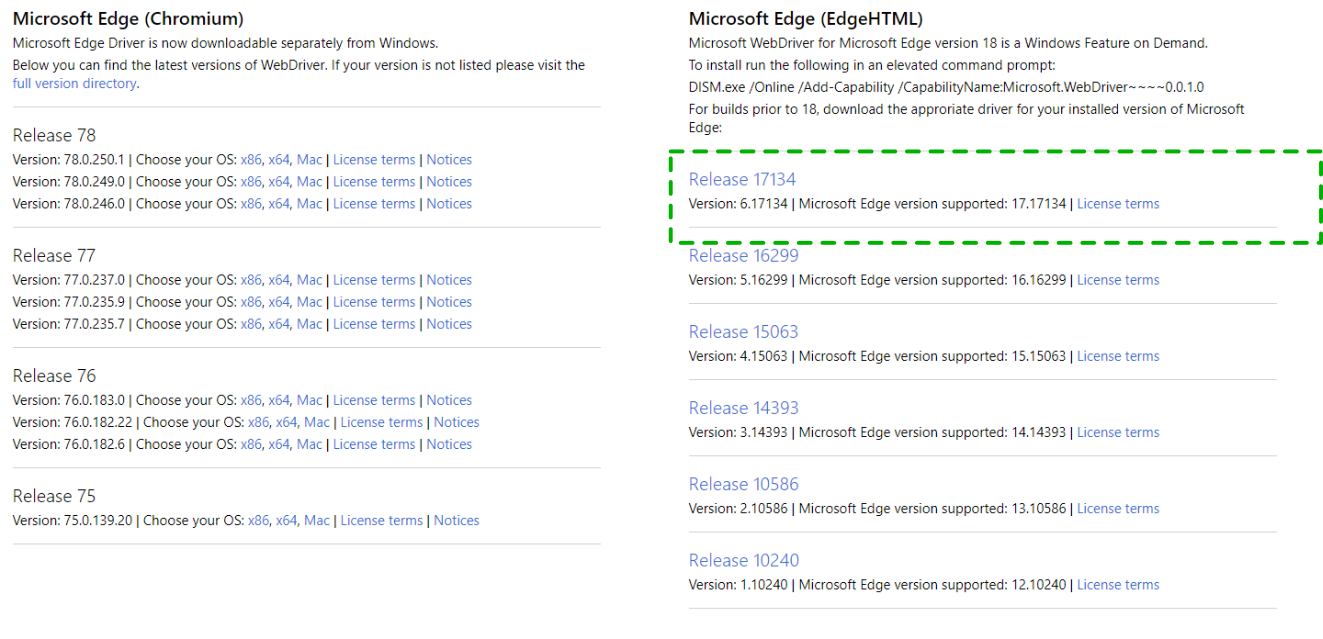
Proper configuration is required in order to run tests on Edge. Download the MicrosoftWebDriver.exe v.17134 which is provided here. Make sure you download download the right version for 'Microsoft Edge (EdgeHTML)', circled below. This file needs to be on the system PATH.
Internet Explorer/ Edge: Set the zoom level to 100%
The zoom level of the browser should be set to 100%. You can set the zoom level on both browsers to 100% by pressing the settings wheel -> Zoom.
If the zoom level is not set to 100% the test run will fail to execute actions properly.
In most cases this is all that is needed in order for IE or Edge to run properly. If you have any further issues please take a look at the complete configuration guide provided by Selenium here.
Configuring Chrome
Proper configuration is required in order to run tests on Google Chrome. Download the latest appropriate drive for your Chrome version which is provided here. This file needs to be on the system PATH.
Configuring Firefox
Proper configuration is required in order to run tests on Mozilla Firefox. Download the latest appropriate drive for your Firefox version and OS which is provided here. This file needs to be on the system PATH.
Installation maintenance tasks
It is not unusual to have several MAXIMO installations active especially in large corporate environments e.g. Development, Testing, UAT and Production installations.
This is mainly because you want to control the way you introduce any changes to your MAXIMO production system. Changes are first made on Development system and after assessment are propagated to other systems. This way you can test and accept or refuse changes and also test any installation procedure related to the changes. Specific change may involve MAXIMO class file change(s) and/or database structure change(s). Any change to class file requires MAXIMO EAR file to be built and deployed. Also, usual procedure for Testing and UAT installations is refreshing of database with Production data in order to reduce risk and do your final tests based on real life data.
Your MaxTAF installation may be impacted by above changes to MAXIMO installation.
Maximo EAR File Change
Change to EAR file may impact MaxTAF if you moving your MAXIMO files from system where MaxTAF was not installed. In this case you need to extract MaxTAF archive (zip) files to <MAXIMO_HOME> folder as described above. You need to build and deploy EAR file afterwards.
Refreshing Of Database With Production Data
Database refresh may impact MaxTAF in two ways:
- Production system does not have MaxTAF installed yet
- Production system does have MaxTAF installed
In first case you need to follow the above procedure to install MaxTAF.
In this case, before refreshing database you need to export your Test Cases and Test Suites if you have any. After database refresh, you can import your Test Cases and Test Suites back into database. Please refer to MaxTAF User�s Guide regarding import and export procedure. Before you import data back check if you already have existing Test Cases or Test Suites in the system. If there are existing Test Cases or Test Suites you can simply delete it or if you want to keep it please make sure that it will not interfere with the data you want to import.
Also, make sure that you restore your MaxTAF properties after refreshing database.
MaxTAF Uninstall
MaxTAF uninstall involves removing the Maximo add-on and related objects from database and Maximo application server home directory.
Before you begin
The uninstall of MaxTAF will modify configuration and content of your application server, database server, and directory server. These servers are known as the middleware servers. Prior to uninstall, make sure to backup the middleware servers, database, administrative workstation.
Backing up MaxTAF tests and custom tags
Before uninstall, if you intend to keep your tests, make sure that you export tests and test suites from Maximo application.
If you intend to remove MAXTAF_DIR and have any custom created tags you would like to keep, then backup related mxml components from MAXTAF_DIR. You may backup tests from MAXTAF_DIR folder as well, but they will be in code format, and not ready for import to Maximo application.
Uninstall procedure
- Stop the Maximo application server
- Navigate to directory <MAXIMO_HOME>\tools\maximo\maxtaf\
- Run maxtaf_uninstall.bat (for Linux: maxtaf_uninstall.sh)
- Remove file maxtaf_uninstall.bat (for Linux: maxtaf_uninstall.sh) and directory <MAXIMO_HOME>\tools\maximo\maxtaf\
- Start the Maximo application server